The goal for the monthly exercises was to learn to appreciate the marriage of the art and the heart that is enveloped into even the simplest of quilting projects. Through our quilted creations, we tap into the "artist" within ourselves—either consciously or subconsciously—as well as the right and left sides of our brains. This Inspirational Quilting program was designed to help define the concepts of art and design and to strengthen our confidence in applying them in our quilts. For centuries, our fore-mothers knew that quiltmaking served as an artistic outlet. This program served as a reminder of that.
Here is a recap of the programs and exercises that were presented throughout 2011.
October Lesson: Borders and Finishing
Once the center section of a quilt is complete, the next question is whether to add one or multiple borders or none at all. A border can continue the design of the center, complement it, or frame the composition. However, some quilt patterns or designs do not require any additional frames which could distract from the main composition or focal point. Determine what your quilt needs by auditioning border options and making visual judgments.
 |
| Some quilt patterns and art quilts do not benefit from a border. |
 |
| A border can continue the theme of the quilt or the piecing pattern into the edges, provide an opportunity for additional design elements, or frame a composition and direct the eye back to the center of the composition. |
Techniques such as mitered borders, piping, flanges, beading and the choice of fabrics for a binding can make the difference between a good composition and a stunning quilt. When the quilt is finished and bound, don't forget to add the label!
Continuing Education: Following the instructions of p. 74 of the Fearless Design book, take a photo of a quilt and audition several borders using blank paper frames.
---------------------
September Lesson: Surface Design
There are hundreds of ways to create color, pattern, depth and dimension on the surface of cloth. The Surface Design lesson skimmed the surface, so to speak, with examples of foiling, stenciling, silk screen, oil paint sticks and painting and printing on fabric. Some techniques applied color directly onto the fabric while others used stencils, screens and templates to mask certain portions of the fabric to achieve pattern, texture and layers.
 |
| Left: stencils and a stencil brush create images and patterns with fabric paints. Right: colorful metallic foils are applied using adhesives and heat. |
Materials and tools needed for surface design can be easily found at craft stores, art supply stores and on line. Interesting patterns and motifs can also be created using simple supplies such as freezer paper, masking tape and fusible web. With pre-treated fabric sheets, images can be printed directly from a computer using an ink jet printer.
 |
| Left: oil paint sticks are applied to a pre-quilted fabric sandwich. Center and right: a deconstructed silk screen process adds pattern and layers. |
Continuing Education: Experiment with various surface design products. Apply color and pattern to plain or pre-printed fabrics to discover the various effects that can be achieved.
----------------------------
August Lesson: Threadwork
The lesson on Threadwork took a look back into history: from the Industrial Revolution's Victorian crazy quilt era, redwork from the turn of the century, the resurgence of needle arts and crafts of the mid-20th century to the award winning quilts of Caryl Bryer Fallert, Hollis Chatelain, Libby Lehman and work of other threadwork masters and fiber artists like Tom Lundberg, Ellen Anne Eddy and Kaffe Fassett.
Trends in threadwork run the gamut from the highly ornate and decorative to simple, playful images on plain white backgrounds. Design sources and influences come from numerous places: art from other cultures, nature, surroundings, animals, nursery rhymes, personal memories and photos. Many quiltmakers and needle artists work in a series to develop and master a concept, theme, tool or technique. The evolution and discoveries from working in a series are very beneficial.
 |
| Vintage crazy quilt (left) and a study in threadpainting (right). |
 |
| Working in a series |
Continuing Education: Choose one of the three photos on p. 58 of the Fearless book. Using this photo as inspiration, create a series of three small 8" x 8" pieces using any threadwork technique(s)—hand and/or machine. Use the larger piece of stabilizer provided in your kit to make a stitch-out to audition and document threads, colors, stitch patterns and any applicable machine settings. Use the 3 smaller pieces for your series. The tops can be any fabric; wholecloth or pieced. Need a jump start in interpreting your source photo? Consider the approaches in "The Assignment" (p. 58) for ideas.
--------------------------
July Lesson: Innovative Piecing
In addition to sharp points, square corners and symmetrical patches, piecing can take a more liberated approach to add interest, movement, complexity or perhaps a little serendipity to quilts. Innovative piecing techniques can be used for backgrounds, alternate blocks, for the entire composition or used in combination with other techniques such as appliqué or collage. When working with these freestyle techniques, it is easier to work bigger than the size you want the finished piece to be and trim to size once the sewing is complete.
 |
| Curved 4-patch blocks. |
 |
| Insert strips (left) and combining insert strips with curved 4-patch (right). |
 |
| Wacky 9-patch (left) and liberated Log Cabin blocks (right) |
Continuing Education: Starting with 12.5" fabric squares, follow the instructions on the handouts to create blocks using the gentle curved piecing, insert strips and stack-cut-sew-shuffle techniques. Blocks used for Cuddle Quilts can be trimmed to 10.5" (unfinished) size.
------------------------
June Lesson: Color
Color is the first thing most people notice about a quilt. There are numerous approaches to choosing color schemes for quilts: using a focus fabric, looking at the print dots on the fabric selvedge, choosing favorite colors, and finding color inspiration in your surroundings. Often, the design elements of color and value go hand in hand. The color wheel is a tool for selecting color schemes and for determining what is lacking in a less successful color composition.
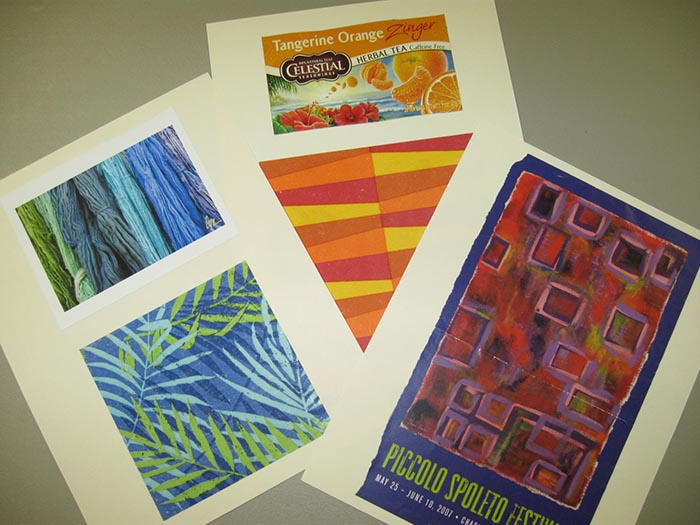 |
| Color inspiration from packaging, postcards, napkins and brochures. |
 |
| Quilt blocks created using colors from the cover of a printed flyer. |
 |
| There are many excellent resources and publications on color, color theory and working with color. |
Continuing Education: Read Chapter 5 in the Fearless textbook. Finish the in-class paint chip exercise. Choose 4 color schemes and use colored pencils to fill in the Clay's Choice block handout. Do the Creativity Exercise (p. 51 in the textbook) with 2 or more colors. Construct the Butterfly quilt blocks with either green or blue background squares (handout).
---------------------------
May Lesson: Identifying Value in Color
Value is the lightness or darkness of a color. Studies indicate that the average person can distinguish 40 different values. It's easy to identify value differences with black, white and gray fabrics, but colored fabrics exhibit value, too. The difference in value between two colors defines the composition and design in a quilt—it helps us see the patterns and shapes. Contrast in value adds interest, complexity, and depth and can create a mood for the viewer.
 |
| Low contrast (left) vs. high contrast (right) |
 |
| A change in value placement creates a different focal point. |
---------------------------
April Lesson: Scale and Variety
Scale in quilts can refer to the scale of the fabric prints or the relative sizes of the pieces which comprise the quilt or the quilt blocks. Good compositions employ variety in scale to make them interesting and balanced.
 |
| Left: small scale prints. Right: large scale prints. |
Variety in scale is often combined with variety in color, value, and the type of print, or texture, (dots, checks, plaids, florals, geometric, novelty, etc.) to add visual interest.
 |
| Top: half-square triangle blocks using open scale prints in a medium value. Bottom: two of the same fabrics combined with alternate fabrics with more variety in print size as well as value. |
Continuing Education: Read Chapter 3 in the Fearless book. Complete the Design Exercise (top of p. 38) that was begun at the meeting. For further exploration, try the Assignment on pp. 32-33.
-----------------------------
March Lesson: Texture
Texture, along with line, shape, value and color, comprise the Elements of Design, the building blocks of visual design and communication. Texture is the perceived surface quality of an object and can be actual or visual.
 |
| Printed fabrics (left) provide a visual texture. Actual texture (right) is seen in smooth silks, woven jacquards and brocades, hand knit fabrics, lace trims, woven linen and quilted cottons. |

Continuing Education: Collect a variety of different fabrics (ie. silks, satins, velvet, burlap, wovens, etc.), threads and embellishments in neutral, white or beige. Create a small composition with these fabrics, concentrating on the use of texture. You can use a small piece of batting, felt or muslin as the base. Feel free to alter the texture of any of the fabrics by scrunching, folding, needle felting, etc. Use hand and/or machine stitching to embroider, stitch or quilt the piece. Add embellishments, if desired, to create additional texture. Add this composition to your 3-ring notebook or sketchbook.
-----------------------------
February Lesson: Balance and Symmetry
Balance is the distribution of the visual weights of the components and units in a quilt to achieve a state of visual equilibrium and a sense of harmony in the design. Symmetry is the regular arrangement of similar parts in a predictable pattern. Asymmetrical compositions can be balanced but may employ other design elements such as color, scale and value to achieve balance. These visual Design Principles appear in quilts—in the construction, block design or the overall layout.
 |
| Asymmetrical composition using scale and placement to create a balanced layout. |
 |
| Compositions using only black and white values. |
 |
| Examples of horizontal axis Mirror Symmetry (left) and Crystallographic Symmetry (right) found in quilts. |
The Critique Process allows us to use the vocabulary of design to analyze, interpret and discuss quilts.
Continuing Education: Read Chapters 1 and 2 and "The Critique Process" (p. 11-12) in the textbook. Do the Assignment on p. 18 using fabric or paper. Choose a convenient size for your compositions: a standard 8-1/2" x 11" paper size or a size that fits easily in your sketchbook or 3-ring notebook. Experiment with different types of symmetrical balance and asymmetrical layouts.
-----------------------------
January Lesson: "Learning to See Again"
Stretch and tone those right-brain muscles with contour drawing and word association exercises. Find inspiration for your quilting anywhere. Begin a reference library of doodles, drawings and sketches that can be used for applique, block patterns, quilting designs, and innovative or free-form piecing. |
| Contour drawings |
 |
| Word association exercise. A study in line, shape, movement and line as texture. |
-----------------------------

The Choo Choo Quilt Guild is launching a program in 2011 called "Inspirational Quilting: Uncovering the Quilter within." The goals of the yearlong program are to provide opportunities for growth, creativity, experimentation, learning and critique, and to define terms and provide a "language" by which we can discuss our quilts and quiltmaking processes.
The book,"Fearless Design for Every Quilter," by Lorraine Torrence and Jean B. Mills, will be used as the program's textbook for assignments and reference.
Monthly meeting activities and lessons will cover topics such as:
:: tapping into the right side of the brain
:: finding inspiration
:: the Elements and Principles of Design
:: piecing, threadwork, and embellishment
:: binding and finishing
:: the value of positive feedback and critique.
The topics and concepts discussed apply to traditional and contemporary quilts.